You can easily enhance your space with 10 DIY farmhouse decor projects you can complete in a weekend. Construct a stylish coffee table with hidden storage or craft a vintage-inspired lampshade for that charming touch. A faux farmhouse fireplace adds warmth, while industrial pipe shelving combines function with flair. Create a chevron arrow wall decor piece or a rustic wooden sign that reflects your personality. Don’t forget a cozy blanket ladder and a mason jar vanity light fixture for added charm. These projects not only elevate your decor but also ignite your creativity, paving the way for more ideas in the future. With just a few simple materials and a little creativity, you can completely transform your home with these DIY farmhouse decor projects. Whether you’re aiming to add a hint of rustic charm or establish a cozy, welcoming atmosphere, these projects have you covered. So roll up your sleeves, grab your tools, and get ready to elevate your home decor to the next level with these enjoyable and practical DIY projects that will revamp your space.
Key Takeaways
- Create a DIY Coffee Table with Storage to enhance both style and functionality in your living room using basic tools and sturdy wood.
- Construct a Vintage Inspired Lampshade using book pages and Mod Podge for a unique, budget-friendly decor piece.
- Build a DIY Blanket Ladder from 1×3 inch wood boards for a rustic display of blankets and enhance your farmhouse aesthetic.
- Design DIY No Sew Curtains with lightweight fabric and fabric glue for a quick, stylish window treatment that fits farmhouse decor.
- Assemble a Faux Farmhouse Fireplace using wood planks and screws to bring warmth and charm to your living space in just one weekend.

VASAGLE LIRY Collection – Farmhouse Coffee Table with Storage, Square Center Coffee Table for Living Room, with Hidden Compartment, Flip-Top Lids, Honey Brown and Rustic White ULCT232W73
Modern Farmhouse Style: This coffee table from LIRY Collection combines a first-of-its-kind rustic white color, recessed panels, and…
As an affiliate, we earn on qualifying purchases.
As an affiliate, we earn on qualifying purchases.
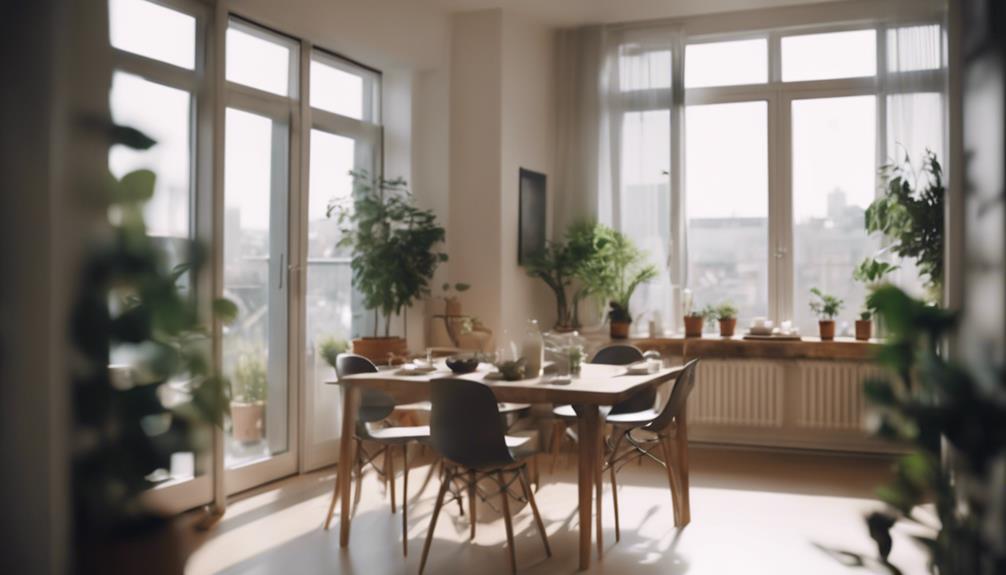
DIY Coffee Table With Storage
If you're looking to add both style and functionality to your living room, a DIY coffee table with storage is the perfect project for you. Not only does it enhance your space, but it also provides a practical solution for organizing books, magazines, or blankets.
Incorporating natural materials like wood will align with the current modern farmhouse decor trends, making your table not only functional but also aesthetically pleasing. You can build this stylish piece using sturdy wood, typically costing between $50 and $100, depending on your materials.
For this DIY Home Decor project, you'll need basic tools like a saw, drill, screws, and sandpaper, making it accessible even for beginner DIY enthusiasts. The design is versatile; you can customize it to fit your aesthetic, whether you prefer rustic farmhouse charm or modern industrial flair.
Completing this coffee table over a weekend is achievable, giving you a quick and rewarding addition to your home. With an under-storage compartment, it serves both as a centerpiece and a practical storage solution, helping you declutter your living space.

DIY Lampshade Kit 8"x12" White – DIY Lamps Shade Making Kit with All Materials – Self-Adhesive Lampshade Backing, Metal Rings, Double Sided Tape and Instructions No Fabric Included – Adult Craft Kit
DIY LAMP SHADE KIT 8" x 12" – Complete Drum Lamp Shade Making Kit Create your own 12…
As an affiliate, we earn on qualifying purchases.
As an affiliate, we earn on qualifying purchases.
Vintage Inspired Lampshade

Creating a vintage-inspired lampshade is a wonderfully simple project that can transform your lighting into a charming focal point.
This DIY project isn't only budget-friendly—costing around $10 or less—but can also be completed in just a few hours, making it perfect for a weekend activity.
Incorporating a unique lampshade can elevate your space and enhance the overall ambiance, similar to how stylish wall clocks can transform spaces.
Here's how to get started:
- Gather Materials: You'll need a plain lampshade, book or magazine pages, and Mod Podge for adhesion.
- Cut the Paper: Snip the pages into your desired shapes or strips.
- Apply Mod Podge: Brush a layer of Mod Podge onto the lampshade, then place the paper on top, smoothing out any wrinkles to guarantee a clean finish.
- Seal the Design: Cover the entire shade with another layer of Mod Podge to protect your design and let it dry completely, which usually takes a few hours.
Once dry, your vintage-inspired lampshade will add a cozy, rustic touch to any room.
Immerse yourself in this DIY project and enjoy the satisfaction of crafting something beautiful for your home!
chilinii Farmhouse Wooden Blanket Ladder with Removable Hooks, 6-Tier Rustic Blanket Rack Decorative Stand, Leaning Towel Quilt Rack Holder for Bathroom Living Room Decor Brown
Premium Handcrafted Quality: Made from high-quality wood by skilled craftsmen, this quilt rack ladder ensures sturdiness and durability….
As an affiliate, we earn on qualifying purchases.
As an affiliate, we earn on qualifying purchases.
Faux Farmhouse Fireplace

Adding a faux farmhouse fireplace can bring warmth and charm to your living space, much like a vintage-inspired lampshade enhances your lighting. This project isn't just affordable—costing under $600—but also a fantastic way to create a cozy focal point in your home without the need for a built-in fireplace.
Additionally, incorporating cozy teenage girl room colors can further enhance the inviting atmosphere of your space.
To get started with your DIY farmhouse decor, you'll need basic woodworking skills and supplies like wood planks, screws, and finishing materials like paint or stain. Construct a mantel to mimic the look of a traditional fireplace and leave space above for a TV, blending functionality with rustic farmhouse aesthetics.
Once your structure is complete, you can enhance its look by adding decorative elements such as candles, logs, or seasonal decor. This not only elevates the visual appeal but also allows you to change the ambiance according to the season or occasion.
With careful planning and execution, you can complete your faux farmhouse fireplace in just one weekend, making it an achievable project that transforms your living space into a warm and inviting retreat.

Avana Rustic Fireplace Mantle Shelf 60 Inches – Handcrafted Wood Mantles for Over Fireplace – Wall Mounted Farmhouse Fireplace Mantel Shelf – Floating Fireplace Mantels 60 Inch X 8 X 5 Rustic Natural
A Classic Accessory — Give your living room a boost of elegance and bring refinement into focus with…
As an affiliate, we earn on qualifying purchases.
As an affiliate, we earn on qualifying purchases.
DIY Industrial Pipe Shelving
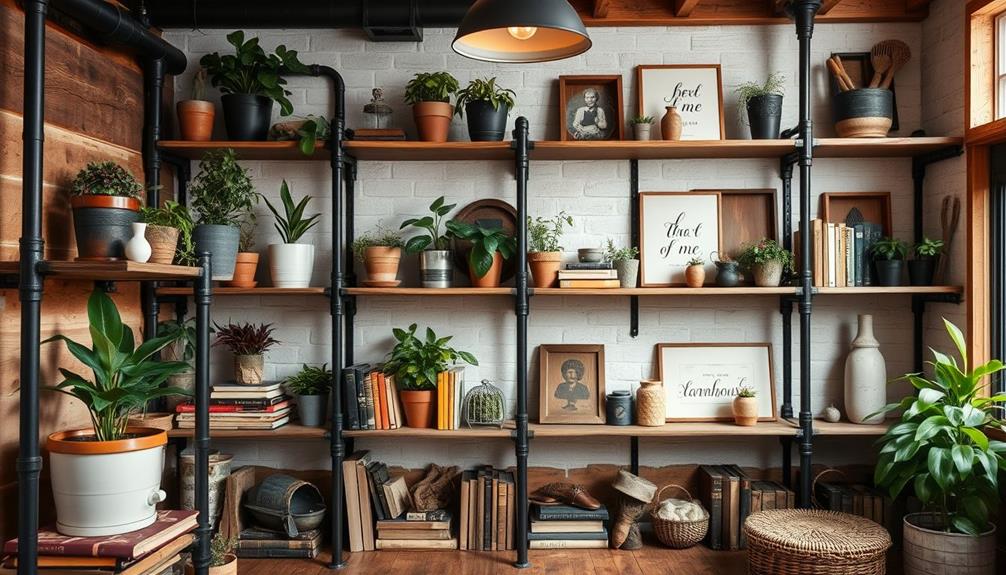
Industrial pipe shelving is a fantastic way to blend functionality with style in your home. This DIY project utilizes standard metal pipes and wood planks, creating a sturdy and stylish storage solution that fits perfectly with DIY farmhouse decor.
By incorporating elements of modern farmhouse bedroom design, you can further enhance the aesthetic appeal of your space. Best of all, it's an easy DIY you can tackle over the weekend.
Here's how to get started:
- Gather Materials: Purchase metal pipes, fittings, and wood planks that suit your desired dimensions.
- Choose Your Size: Customize the shelf dimensions to fit your space; common depths range from 10 to 12 inches, while length varies based on your needs.
- Tools Needed: You'll need minimal tools—just a drill, wrench, and saw—to complete the project, making it accessible for beginners.
- Cost-Effective: Expect to spend around $50 to $100, which is considerably less than buying pre-made shelves.
Once you've built your shelves, you can display books, plants, or decor items, enhancing your space with a trendy industrial touch.
Enjoy your new DIY industrial pipe shelving that adds character and functionality to any room!
Chevron Arrow Wall Decor
After enhancing your space with industrial pipe shelving, consider incorporating chevron arrow wall decor to further elevate your farmhouse aesthetic. This charming DIY farmhouse decor project isn't only budget-friendly, but it also adds a rustic touch that complements your existing home decor beautifully.
Additionally, personal attributes linked to your zodiac sign may influence your design choices, making your space feel even more unique and reflective of your personality. This project allows you to express yourself creatively, enhancing the overall allure of your home through simple craftsmanship and thoughtful design astrological compatibility.
You can easily create this wall art using supplies from your local craft store, like wood, paint, and brushes. Don't worry if you're new to woodworking; this project doesn't require advanced skills.
Start by cutting the wood into triangular shapes, then arrange them in a chevron pattern that speaks to you. Once you're satisfied with the layout, secure the triangles to a backing board.
With your chevron arrow wall decor assembled, you have a stunning statement piece ready to hang. It can stand alone or be incorporated into a gallery wall, enriching your farmhouse vibe.
Customize the size and colors to fit your style, ensuring it ties seamlessly into your home. You'll love how this simple project transforms your space, making it uniquely yours.
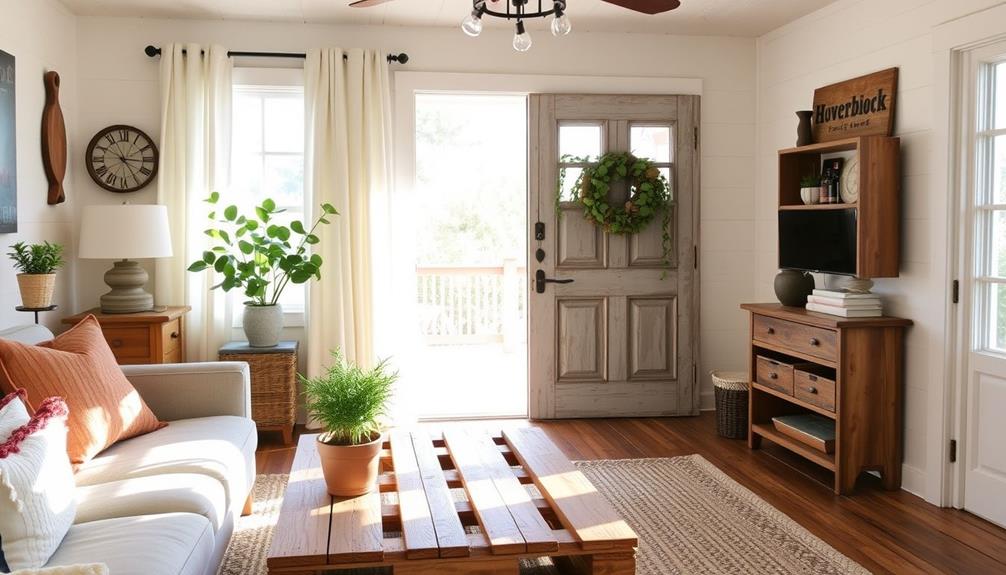
DIY No Sew Curtains
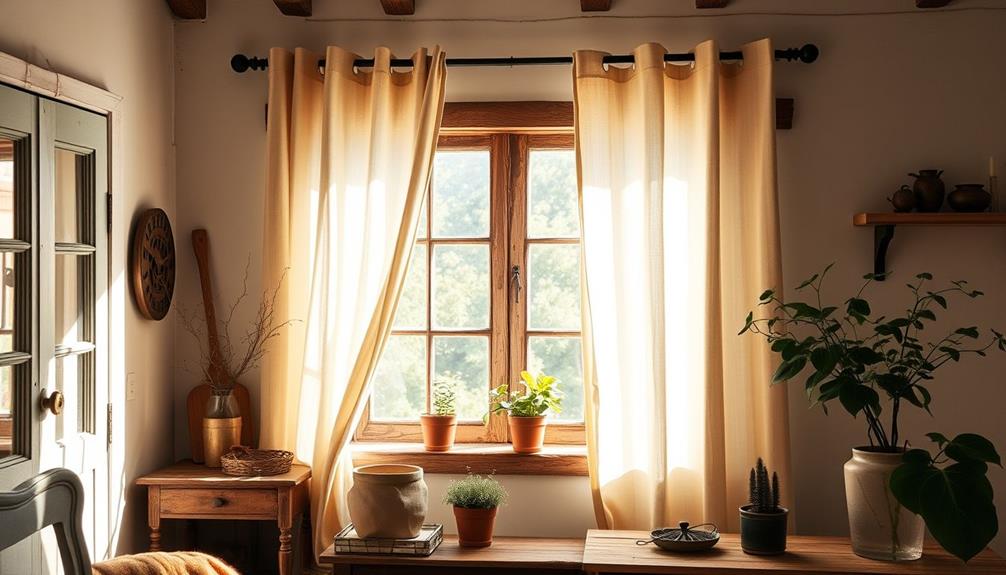
Creating DIY no sew curtains is a fun and budget-friendly way to add a personal touch to your space.
Not only can these curtains enhance your decor, but they can also improve the overall ambiance and cleanliness of your home, similar to how a range of services offered by home cleaning services can transform a living area.
You'll need a few simple materials, and I'll walk you through the step-by-step process to get it done.
Plus, I'll share some styling tips to help you achieve that perfect farmhouse look!
Materials Needed Overview
When you're ready to make DIY no sew curtains, gathering the right materials is vital for a smooth process.
These curtains not only enhance your space but also fit perfectly into your DIY farmhouse decor ideas. For a more polished look, consider using well-draining soil to create a cozy atmosphere with indoor plants.
Here's a quick overview of the materials needed:
- Fabric: Choose lightweight options like cotton or linen. You'll typically need about 2-3 yards, depending on your window size.
- Fabric Glue or Iron-On Hem Tape: This will secure the edges without sewing. Pick one based on your preference for application.
- Scissors: Sharp scissors are essential for cutting your fabric to the desired length and width.
- Measuring Tape: Measure your windows to guarantee your curtains fit perfectly, allowing extra inches for hems.
Once you gather these materials, you can start preparing your fabric by cutting it to the right dimensions.
Remember to fold over the edges for a clean finish, which you'll secure with the glue or tape.
Step-by-Step Process
To make your DIY no-sew curtains, start by selecting a lightweight fabric that matches your farmhouse aesthetic.
Consider choosing materials that can withstand potential pet interactions, as cats may have a tendency to hide or play near drapery. Make sure it's at least 2-3 times wider than your window for a full, inviting look.
Next, cut the fabric to your desired length, typically around 84 inches for standard windows, allowing extra for hems at the top and bottom.
Now, use fabric glue or iron-on hem tape along the edges to create a clean finish without sewing. Press firmly to secure the hem.
For a simple rod pocket, fold down the top edge of the fabric to form a channel for the curtain rod, securing it with glue or tape. This will allow the rod to slide through easily.
Remember that creating a comfortable environment for your pets can also involve understanding toxic plants to prevent any accidents.
Styling Tips Included
Enhancing your space with DIY no-sew curtains can effortlessly elevate your farmhouse decor. These super easy curtains require no sewing skills, making them perfect for your weekend project.
Consider complementing your decor with vegan-friendly gifts that align with your aesthetic. Follow these styling tips to achieve a polished look:
- Choose the Right Fabric: Opt for neutral tones or rustic patterns like plaid or burlap. This enhances the farmhouse style and creates a cozy atmosphere.
- Measure Accurately: Measure your window dimensions carefully. Cut the fabric to size, ensuring it hangs gracefully without dragging on the floor.
- Secure the Edges: Use fabric adhesive or hem tape to secure the edges of the fabric. This provides a clean finish without visible seams or stitching.
- Add Embellishments: For a customized touch, consider adding tassels or using wooden curtain rods. These details align beautifully with the farmhouse aesthetic.
Rustic Wooden Sign

Creating a rustic wooden sign adds a personal touch to your farmhouse decor, and it's easier than you might think. Start by sourcing reclaimed wood or buying wooden boards from a craft store. Make sure they're sanded smooth for a polished finish.
Next, you can use stencils or freehand lettering to paint your favorite quote or design onto the wood. Opt for acrylic or chalk paint to achieve that charming farmhouse aesthetic. For added texture, distress the edges with sandpaper or a hammer to enhance the rustic look. Finally, seal your sign with a clear varnish to protect it from wear and tear, especially if it'll be outdoors.
Once your sign is complete, hang or prop it in a prominent spot in your home, like the living room or entryway, to make a statement.
Here's a quick reference table to guide you:
| Step | Materials Needed | Tips |
|---|---|---|
| Choose wood | Reclaimed wood or boards | Sand smooth |
| Design your sign | Stencils or paint | Use acrylic or chalk paint |
| Distress edges | Sandpaper or hammer | Lightly distress |
| Seal the sign | Clear varnish | Protect from elements |
| Display your sign | Hooks or stands | Choose a prominent spot |
Farmhouse Beam Chandelier
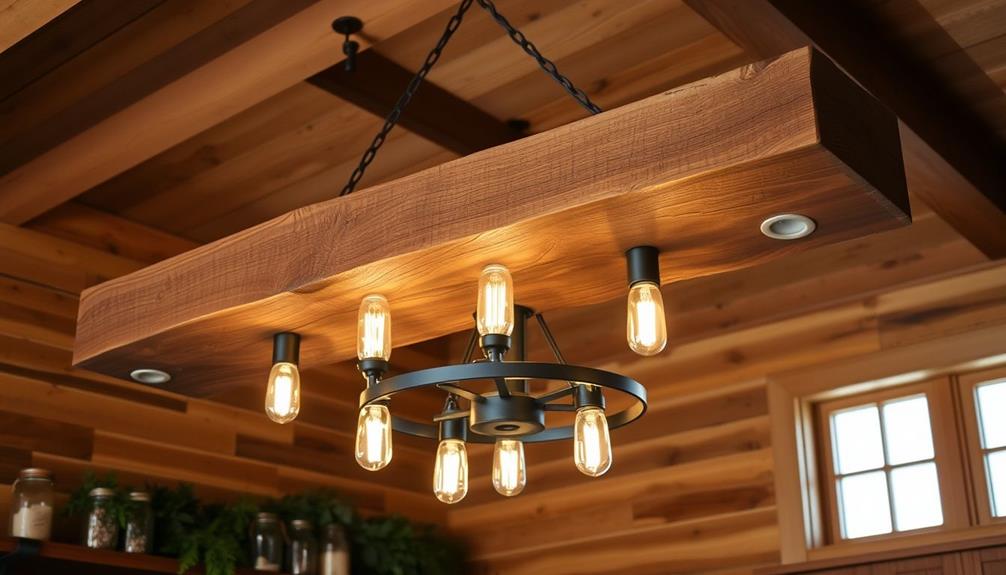
A farmhouse beam chandelier adds both rustic charm and a touch of elegance to your space. This stunning lighting fixture not only enhances your decor but also serves as a budget-friendly farmhouse DIY project, with materials typically costing around $120.
Plus, using reclaimed wood beams makes it an eco-friendly choice. Incorporating natural materials like wood aligns perfectly with the principles of cottagecore room decor, creating an inviting and serene atmosphere.
To create your own farmhouse beam chandelier, follow these steps:
- Gather Materials: Collect reclaimed wood beams, Edison bulbs, and necessary hardware.
- Cut Wood to Size: Measure and cut the wood beams to your desired length for the chandelier.
- Assemble the Frame: Securely mount the beams together, ensuring stability for the light fixtures.
- Install Edison Bulbs: Place Edison bulbs in the sockets for that perfect vintage look and warm glow.
With basic woodworking skills, this project is accessible for DIY enthusiasts.
Once completed, your chandelier will serve as a stunning focal point in dining areas or living rooms, effortlessly elevating the overall farmhouse style of your home. You'll love the cozy ambiance it brings to your space!
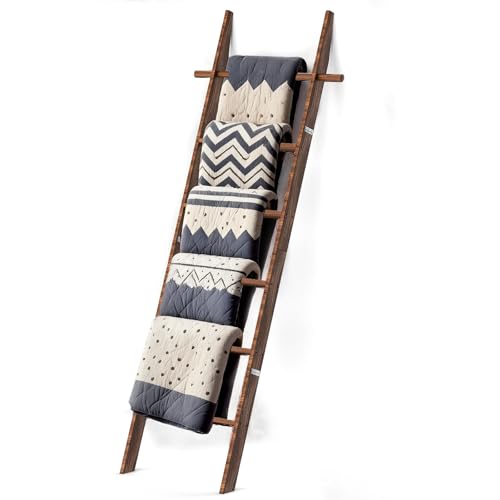
5 DIY Blanket Ladder
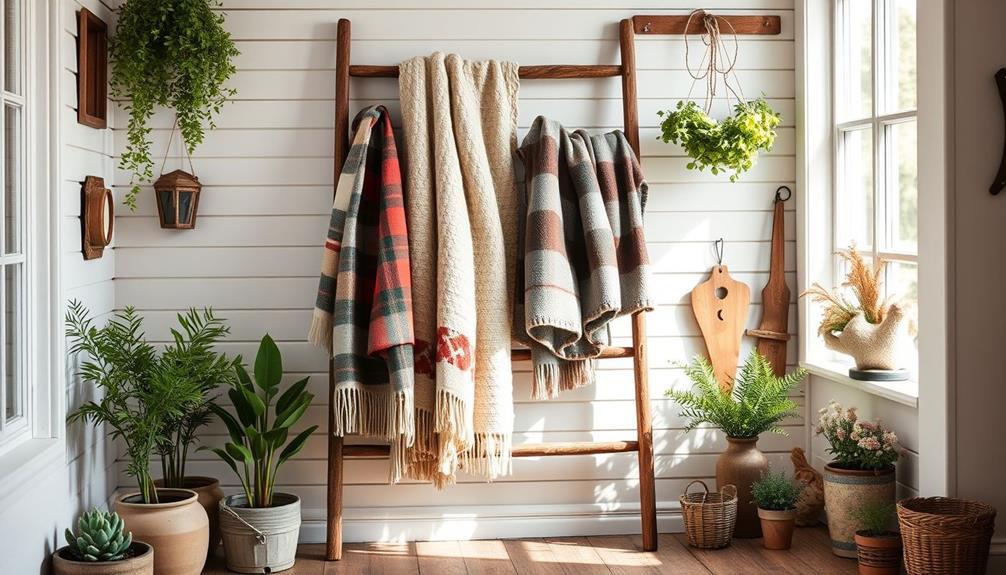
Creating a DIY blanket ladder is a straightforward project that adds both style and storage to your space.
You'll need just a few wooden boards, screws, and some basic tools to get started.
Let's walk through the materials you'll need and the step-by-step instructions to make your own ladder.
Materials Needed Overview
To build your own DIY blanket ladder, you'll need a few essential materials that are both budget-friendly and easy to work with.
This project is perfect for enhancing your DIY farmhouse decor. Here's a quick overview of the materials needed:
- 1×3 inch wood boards: These are affordable and provide a rustic look that's perfect for a farmhouse style.
- Saw: You'll need this tool to cut the wood to your desired ladder height, typically around 5 to 6 feet for the best display.
- Wood screws and a drill: These are essential for securely fastening the ladder rungs to the side rails, ensuring that your ladder is stable and durable.
- Sandpaper or a sanding block: Use these to smooth out any rough edges on the wood, giving it a polished finish that enhances the overall aesthetic.
Optionally, you can add a wood stain or paint to customize your ladder and match your home decor.
With these materials gathered, you'll be well on your way to creating a stunning DIY blanket ladder that adds charm to your space.
Step-by-Step Instructions
Start by gathering your materials and cutting the wooden boards to your desired height, usually between 5 to 6 feet. For the rungs, cut smaller pieces to about 24 inches. Here's a quick overview to guide you:
| Step | Description | Tips |
|---|---|---|
| 1. Cut Boards | Cut three 1×4 boards to your desired height. | A miter saw works best. |
| 2. Prepare Rungs | Cut additional pieces for rungs. | Keep them uniform at 24". |
| 3. Assemble | Secure rungs to side boards using wood screws. | Space them 10-12" apart. |
| 4. Finish | Sand all surfaces for a smooth finish. | Choose a farmhouse color. |
| 5. Secure | Attach L-brackets to the wall for stability. | Ideal for hanging blankets. |
After assembling, sand down all surfaces to create a smooth finish. Consider applying a wood stain or paint in a farmhouse style color for added charm. Finally, secure the ladder to the wall with L-brackets for stability, especially if it'll be holding heavier items like blankets. Enjoy your easy, DIY farmhouse decor project!
Mason Jar Vanity Light Fixture
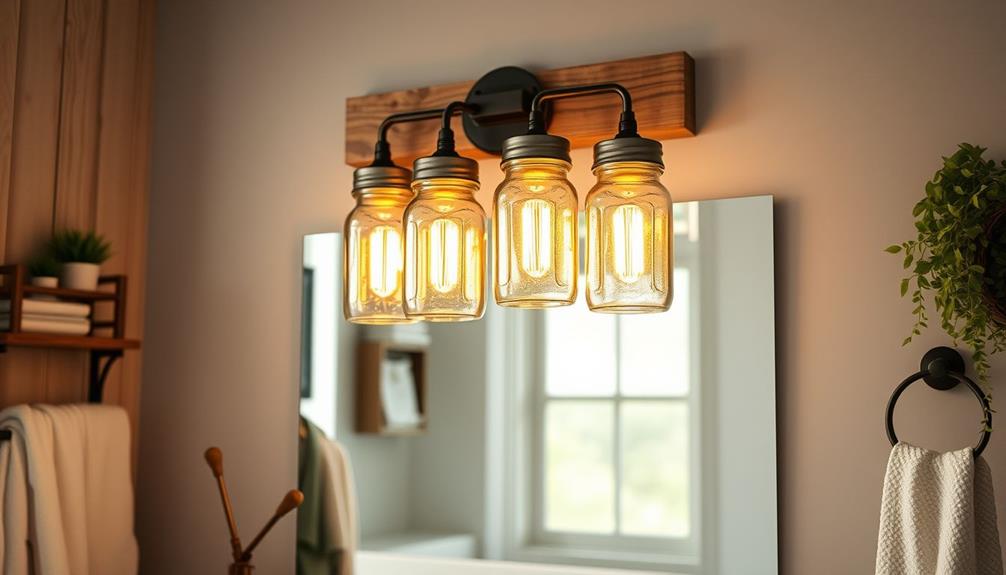
When you're looking to add a touch of rustic charm to your bathroom or dressing area, a mason jar vanity light fixture provides a stylish yet affordable solution. You can create this stunning piece for under $20, making it a fantastic addition to your DIY farmhouse decor.
Here's what you'll need to get started:
- Mason Jars – Choose various sizes or finishes for a personalized look.
- Light Fixtures or Sockets – These will hold your light bulbs securely.
- Wooden Board – This serves as the mounting base for your fixture.
- Basic Electrical Tools – Verify you have everything you need for safe wiring.
To install, secure the wooden board to the wall, attach the light sockets, and place the mason jars over the bulbs.
The result? A warm glow that enhances your space while showcasing the unique character of mason jars.
This DIY project not only elevates your decor but also provides excellent ambient lighting, perfect for those cozy mornings or relaxing evenings.
Immerse yourself in this project and transform your area with a touch of rustic elegance!
Frequently Asked Questions
How Do You Get the Farmhouse Look on a Budget?
To get the farmhouse look on a budget, use reclaimed wood or thrift store finds for unique decor. Incorporate affordable textiles, and don't shy away from simple DIY techniques to personalize your space creatively.
What Decor Style Is Replacing Farmhouse?
Modern rustic and Scandinavian designs are replacing farmhouse decor. They focus on minimalism, functionality, and natural materials. You'll find biophilic and sustainable elements gaining popularity, offering a rejuvenating approach to creating inviting and calming spaces.
How Can I Decorate My Home Farmhouse Style?
You might think farmhouse decor's too rustic for your taste, but it's all about warmth. Incorporate natural materials, vintage finds, and neutral colors to create a cozy, inviting atmosphere that feels effortlessly stylish.
What Is the Most Popular Farmhouse Decor?
The most popular farmhouse decor includes rustic wood features, vintage items, and neutral color palettes. You'll love incorporating textiles like linen and burlap, along with charming accessories, to create a cozy, inviting atmosphere in your home.
Conclusion
You might think you don't have the time or skills for these projects, but that's where you're wrong! Each DIY is designed to be simple and achievable in just a weekend. With a little creativity and a few supplies, you'll transform your space into a charming farmhouse haven. So grab your tools and get started—these projects are not only fun but also a rewarding way to add your personal touch to your home!