
Transform your living area with do-it-yourself home decor using basic tools! Create a stylish Macrame Wall Hanging with simple knots and beads for a unique touch. Craft a trendy Concrete Hanging Planter by combining concrete and shaping it with a dowel. Give a plain mirror a classy Brass Mirror Makeover for an elegant finish. Personalize a trash bin with Faux Leather for a unique twist. Stay cozy with a Chunky Tassel Blanket for warmth and style. Add celestial vibes with a Moon Phase Wall Garland. Discover more projects – such as Sunburst Mirror Crafting and DIY Concrete Coaster Set – for never-ending creativity!
Key Takeaways
- Utilize simple tools like scissors, glue, and paint for DIY projects.
- Follow tutorials for macrame wall hangings, concrete planters, and more.
- Customize designs with beads, colors, and textures for a personalized touch.
- Create stylish decor pieces like sunburst mirrors and faux leather upgrades.
- Enhance your space with handmade textiles like tassel blankets and concrete coasters.

Easy Macrame Kits for Adults Beginners Supplier Wood Beads,Rings,Wooden Dowel for Macrame Plant Hangers,Boho Wall Hanging with Instruction Book for Starters Christmas Crafts for Adults
【All in One Macrame Kits for Adults Beginners & Advanced】contain all necessery macrame supplies you need to start…
As an affiliate, we earn on qualifying purchases.
As an affiliate, we earn on qualifying purchases.
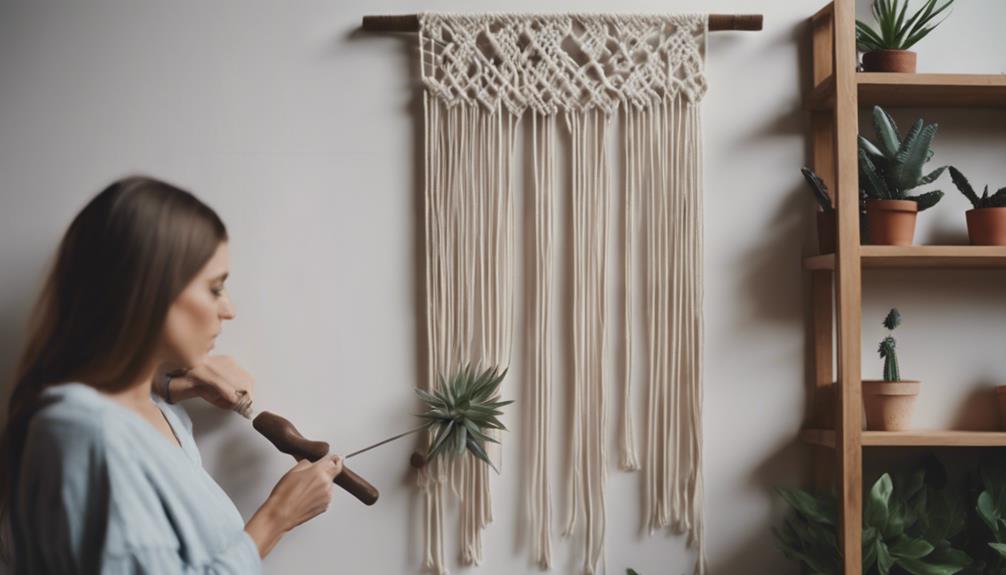
Macrame Wall Hanging Tutorial
Craft your own stunning macrame wall hanging by following this step-by-step tutorial. Macrame wall hangings are a trendy and creative way to add a bohemian touch to your home decor.
To start, gather your materials: macrame cords, a wooden dowel or metal ring for hanging, scissors, and optional beads or feathers for embellishments. Begin by attaching the cords to the dowel using lark's head knots.
Then, practice basic macrame knots like the square knot and spiral knot to create intricate patterns and textures. Experiment with different knot combinations to design your unique piece.
As you progress, you can incorporate beads or other decorations to enhance the aesthetic of your wall hanging. Remember to trim the cords evenly at the bottom for a polished finish.
With online tutorials and your creative flair, you'll soon have a beautiful macrame wall hanging to adorn your living space. Enjoy the process and let your imagination guide you in crafting a one-of-a-kind decor piece.

Extra Large Concrete Planter Mold, Heavy-Duty Reusable ABS Molds for Flower Pots, Large Concrete Planter Molds for Indoor and Outdoor Gardening (14.17 Inch)
EXTRA-LARGE & REUSABLE DESIGN: Craft oversized garden decor effortlessly with our heavy-duty concrete planter molds extra large, designed…
As an affiliate, we earn on qualifying purchases.
As an affiliate, we earn on qualifying purchases.
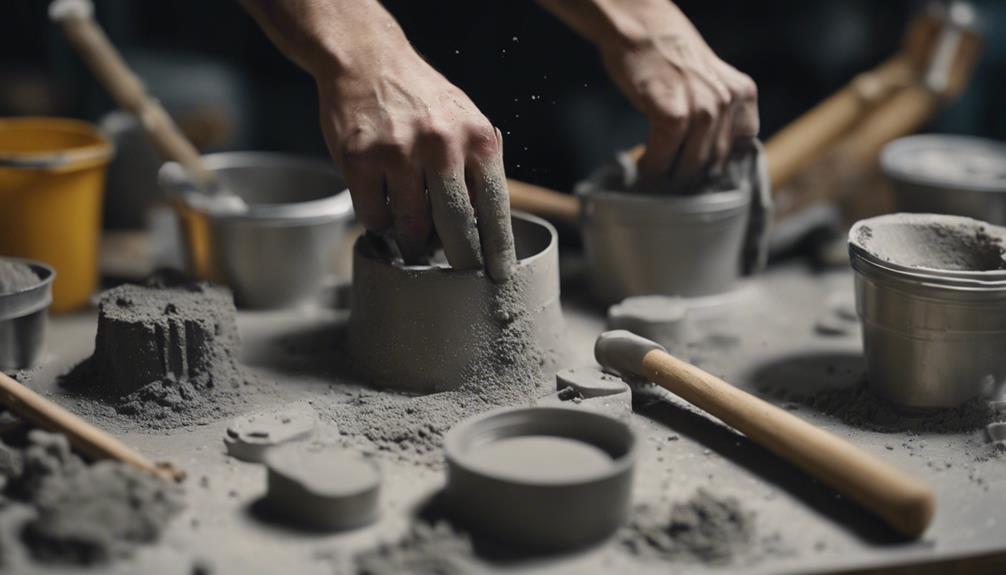
Concrete Hanging Planter DIY
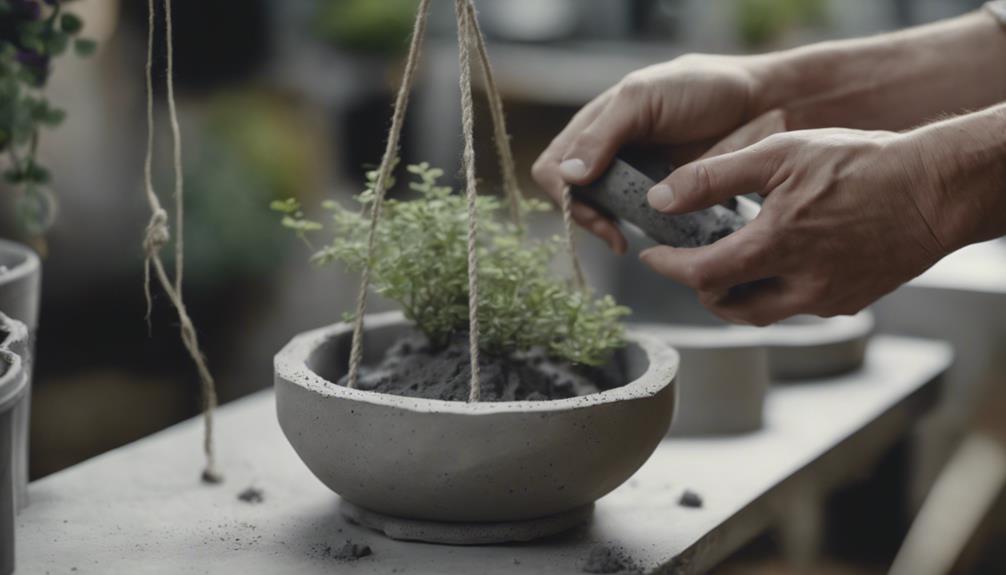
You can create a trendy and minimalist look in your home with a DIY concrete hanging planter project. Gather your materials, follow step-by-step instructions, and get ready to display your plants creatively.
Personalize the planter to match your style and enjoy the satisfaction of crafting a unique decor piece for your space.
Hanging Planter Materials
When creating concrete hanging planters as a DIY project, the key materials you'll need include concrete mix, water, and a suitable mold. Here are some essential items for making your own wall hanging planters:
- Concrete Mix: Choose a high-quality concrete mix suitable for crafting projects. This will secure the durability and strength of your hanging planter.
- Water: You'll need water to mix with the concrete to achieve the right consistency. Be cautious not to add too much water, as it can weaken the final product.
- Suitable Mold: Select a mold that's the desired shape and size for your wall hanging planter. Common molds include plastic containers, buckets, or even handmade molds using cardboard.
- Mixing Tools: Have tools like a trowel or a mixing stick on hand to properly blend the concrete and water together in the mold.
Gathering these materials is the first step towards creating your own beautiful concrete hanging planters to adorn your space.
Step-by-Step Instructions
To begin making your concrete hanging planter, gather the required materials listed in the previous section, including concrete mix, water, a suitable mold, and mixing tools. Follow these step-by-step instructions to create a stylish addition to your home decor:
| Steps | Instructions |
|---|---|
| 1. Mix the concrete | Combine the concrete mix with water in a bucket, following the manufacturer's instructions. |
| 2. Pour the concrete into the mold | Carefully pour the concrete into the plastic container, ensuring it fills up to the desired level. |
| 3. Add the dowel for hanging | Insert a dowel into the center of the concrete, leaving enough exposed for hanging the planter. |
| 4. Cure the planter | Allow the concrete to cure for the recommended time, keeping it moist to prevent cracking. |
| 5. Demold and finish the planter | Gently remove the planter from the mold, sand any rough edges for a smooth finish. |
These simple steps will help you create a personalized concrete hanging planter that complements your home decor.
Creative Plant Display
Craft a stunning display for your favorite plants with a DIY concrete hanging planter that adds a touch of modern elegance to your home decor.
Follow these steps to create your unique plant display:
- Materials Needed: Gather concrete mix, a plastic container for molding, and a sturdy rope for hanging.
- Customization: Choose a container that suits your desired planter size and shape to personalize the hanging planter for your living room.
- Modern Touch: Incorporate the DIY hanging planter into your living room decor to infuse a modern feel and bring nature indoors.
- Enhance Visual Appeal: Experiment with various plant types and arrangements to elevate the aesthetic of your hanging planter and create a visually appealing focal point in your living space.

Amanti Art Mirror Makeover 18×24 Bathroom Mirror Frame Border Kit, Peel and Stick Wall Moulding Frame, Fully Assembled Black Border DIY Kit – Mirrored Glass NOT Included – Grace Brushed Gold Trim
MIRROR MAKEOVER: Designed to be installed OVER your existing bare mirror, you can frame your bathroom mirror at…
As an affiliate, we earn on qualifying purchases.
As an affiliate, we earn on qualifying purchases.
Brass Mirror Makeover Steps
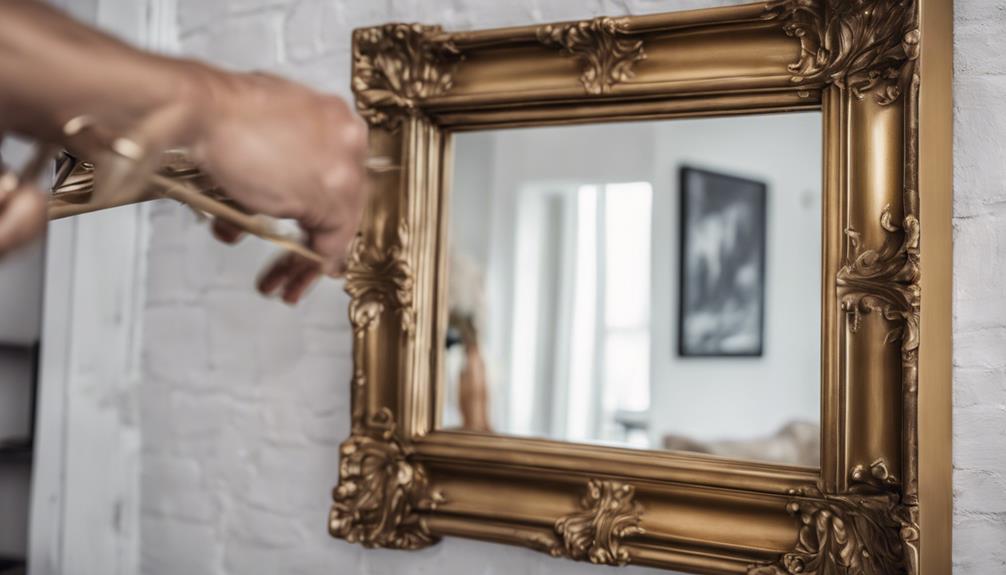
You can achieve a stunning brass mirror makeover by following specific techniques for mirror preparation and brass finish application.
These steps will help you transform a basic mirror into a stylish piece of home decor that enhances your space.
Get ready to elevate your DIY skills with these simple yet effective brass mirror makeover points.
Mirror Prep Techniques
Make certain to thoroughly clean the mirror surface with glass cleaner to remove any dirt, dust, or residue before commencing the brass mirror makeover process.
Here are some mirror prep techniques to help you achieve a successful brass mirror transformation:
- Clean the Mirror Surface: Use glass cleaner to guarantee the mirror is free of any dirt or grime that could impact the makeover process.
- Mask Off Edges: Carefully apply painter's tape along the mirror edges and any areas you want to protect from the makeover to prevent unwanted paint marks.
- Sand the Brass Frame: Lightly sand the brass frame to create a rough surface that promotes better paint adhesion and enhances the longevity of the new finish.
- Apply Metal Primer: Use a high-quality metal primer designed for brass surfaces to ensure the new paint adheres properly and lasts longer.
Brass Finish Application
To achieve a luxurious look for your brass mirror makeover, consider applying a brass finish using spray paint or brass leafing. Before beginning the application process, make sure the mirror is thoroughly cleaned to promote better adhesion of the brass finish.
Use painter's tape to protect the edges of the mirror and surrounding areas from overspray during the application. Apply multiple thin coats of the brass finish, allowing each coat to dry completely before adding the next layer. Experiment with various techniques such as dry brushing or sponge application to create unique textures and effects on the mirror surface.
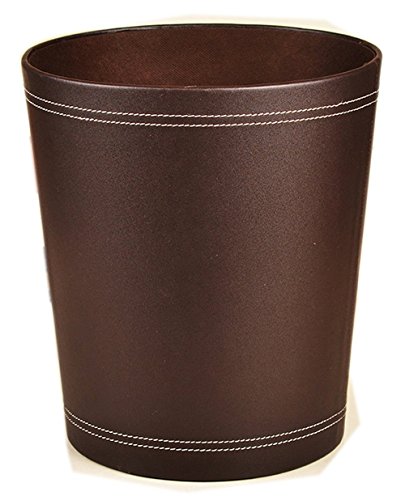
Trash Cans Floor Stand Leather Waste bin Paper Board 12 Liters Garbage Basket case for Hotel Office (Coffee)
Materials: PU leather cover+paperboard
As an affiliate, we earn on qualifying purchases.
As an affiliate, we earn on qualifying purchases.
Faux Leather Trash Bin Upgrade
Upgrade your plain trash bin with a touch of sophistication by incorporating faux leather for a stylish and functional decor piece. By following a DIY tutorial and using simple tools like scissors, glue, and faux leather, you can transform the look of your space with this elegant upgrade.
Personalize the design by selecting a faux leather color that complements your existing decor, making it uniquely yours.
To enjoy this project to the fullest, here are some tips:
- Choose the Right Faux Leather: Select a faux leather material that matches your style and fits the aesthetic of your room.
- Measure Twice, Cut Once: Ensure accurate measurements before cutting the faux leather to avoid errors in the final product.
- Secure with Quality Glue: Use a strong adhesive to make sure the faux leather stays securely attached to the trash bin.
- Follow a Detailed Tutorial: For a seamless process, refer to LoneFox's tutorial for step-by-step guidance on creating this faux leather upgrade.
Chunky Tassel Blanket Project
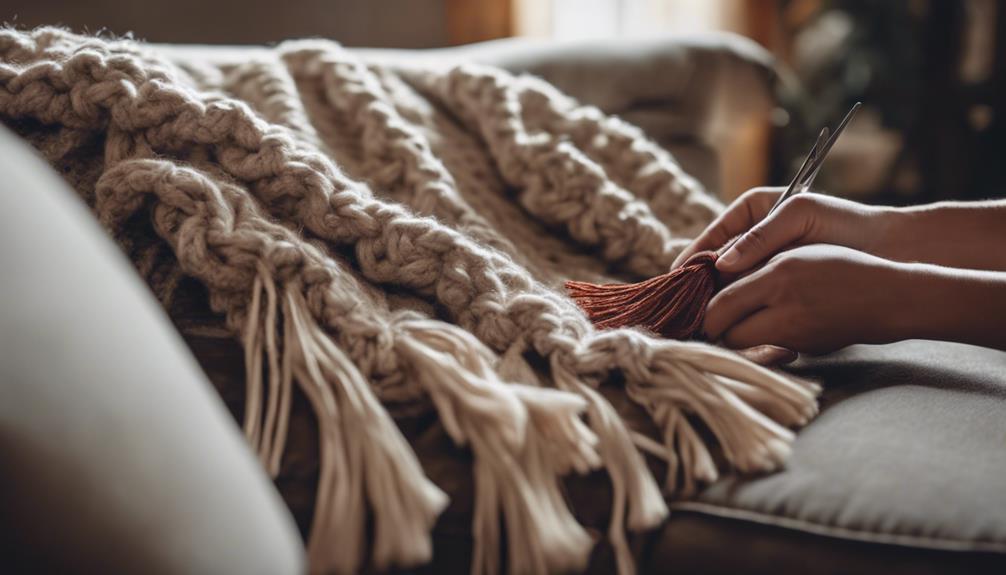
Enhance your home decor with a cozy and stylish touch by starting on the chunky tassel blanket project featured on LoneFox.
This interior design DIY project calls for chunky yarn, scissors, and a tapestry needle to craft the tassels. The step-by-step instructions guide you through creating and attaching the tassels to the blanket, allowing for customization in yarn colors and blanket sizes to match your personal style.
The simplicity of making a chunky tassel blanket is highlighted in LoneFox's tutorial, emphasizing the warm and textured addition it brings to your living space. This project not only offers a practical way to stay warm but also serves as a statement piece in your home decor.
With just a few materials and some creative flair, you can create a cozy blanket that adds a touch of charm to any room, making it a perfect weekend DIY project for interior design enthusiasts.
Moon Phase Wall Garland How-To
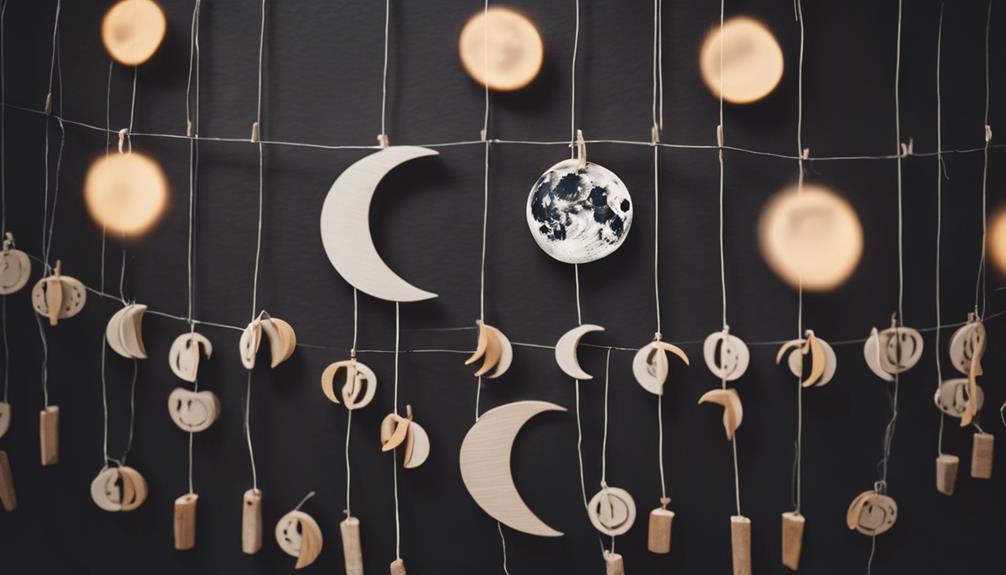
Craft a stylish moon phase wall garland using simple tools like wooden beads, twine, and a wooden dowel by following LoneFox's tutorial.
To enjoy this DIY project, follow these steps:
- Gather Your Materials: Get wooden beads in different sizes, twine, and a wooden dowel to create your moon phase wall garland.
- Follow LoneFox's Tutorial: Watch the step-by-step instructions provided by LoneFox to guide you in crafting the moon phases with the wooden beads.
- Customize Your Design: Choose bead colors and sizes to personalize your moon phase wall garland. Arrange them to represent different moon phases like full moon, crescent, or gibbous.
- Display Your Creation: Hang the finished moon phase wall garland in your bedroom, living room, or office to infuse a celestial touch into your decor.
Enjoy the budget-friendly way to add a unique, handmade piece to your space and showcase your creativity.
Sunburst Mirror Crafting Guide

To craft a stunning sunburst mirror for your home decor, gather a round mirror, wooden dowels, glue, paint, and a saw for this radiant DIY project. Start by painting the wooden dowels in a color of your choice and arranging them around the mirror to create the sunburst effect. Secure the dowels in place with strong adhesive, making sure they radiate evenly around the mirror for a balanced look. Personalize your sunburst mirror by painting the dowels in different colors, adding embellishments, or varying the lengths for a unique design. This DIY project allows you to unleash your creativity and add a touch of elegance to your living space.
| Materials Needed | Tools Required | Tips for Success |
|---|---|---|
| Round mirror | Saw | Paint dowels evenly |
| Wooden dowels | Glue | Secure dowels firmly |
| Paint | Customize for flair | |
| Strong adhesive | Ensure a balanced design |
Get ready to brighten up your home with a gorgeous sunburst mirror that reflects your unique style and craftiness in DIY projects.
DIY Concrete Coaster Set
Create your own set of trendy cement coasters at home using just a few simple tools and materials. Follow these steps to create a nice DIY Cement Coaster Set:
- Gather Materials: Acquire a mixing bowl, measuring cup, stir stick, silicone mold, and cement mix.
- Customize Your Design: Incorporate color pigments or metallic accents to the cement mix for a personalized touch.
- Allow for Curing: Let the coasters cure for at least 24 hours inside the molds before removing them to make certain they're fully set.
- Finishing Touches: Sand the coaster edges for a smooth finish and apply a waterproof sealant to safeguard them from moisture and spills.
Frequently Asked Questions
How to Decorate Your Home With Simple Things?
You can easily decorate your home with simple things by utilizing everyday items creatively. Incorporate natural elements like plants and branches, repurpose old furniture, and use tools like glue guns and paint to personalize your space with charm and style.
How Do You Simplify Home Decor?
To simplify home decor, you focus on decluttering and using multipurpose furniture for space efficiency. Neutral tones and smart lighting create a serene ambiance. Choose versatile pieces for flexibility. DIY projects add a personal touch, saving money and enhancing your space.
How to Make Home Decor Items?
To create home decor items, gather materials, follow tutorials, and harness your creativity. Use simple tools and step-by-step guides to craft unique pieces that reflect your style. Enjoy the process and personalize your living space. There are endless possibilities for diy home decor ideas, from making your own wall art to crafting customized furniture pieces. Take inspiration from nature, art, or your favorite interior design styles to bring your vision to life. With a little effort and imagination, you can transform your home into a personal sanctuary that showcases your individuality.
How Can I Decorate My Home Diy?
Decorate your home DIY with simple tools and creativity. Personalize your space with macrame wall hangings, memory mobiles, and upgraded mirrors. Add a touch of charm with moon phase garlands, tassel blankets, and more.
Conclusion
You've just revealed the secrets to transforming your home with these simple DIY projects! Get ready to amaze your friends and family with your newfound crafting skills.
From macrame wall hangings to concrete coasters, you'll be the envy of all your neighbors. So grab your tools, tap into your creativity, and get ready to turn your home into a masterpiece with these easy-to-follow tutorials.
Let the DIY magic begin!